
We the developers used to call this thing slide0ut menu, fly-in menu or any other name. Last week it’s been made official by google on the ocassion of their annual developer event Google I/O and named them android navigation drawer. This thing is widely popular when facebook introduced it in android and iOS apps a while ago. And there has been some google developed apps in android like google plus, and youtube as well. Here are the screenshots.

All Navigation Drawers. From left to right: youtube, Music and Facebook
In the last week of google announced a new navigation pattern called Android navigation drawer. Along with guideline and sample which requires latest version of android support library v13. Here is how you will implement in your application.
To start working with this, you first need to update to latest android support library, which is v13. If you are using maven, It should be updated via pom.xml. As I am new to maven, I have decided to use traditional replace approach, i.e. delete the old, replace the new. :).
Layout
1 . Ok, once you have Successfully added latest support library, start editing your layout first. Here your root element of your layout xml must be
android.support.v4.widget.DrawerLayout
2 . Here you need to add android name space, an id and width and height parameter. After adding necessary parameters your code should look like below.
<android.support.v4.widget.DrawerLayout xmlns:android="http://schemas.android.com/apk/res/android"
 android:id="@+id/drawer_layout"
 android:layout_width="match_parent"
 android:layout_height="match_parent" >
</android.support.v4.widget.DrawerLayout>
3 . We are prepared to have our drawer layout, now it’s time to have a framelayout, and a list view . The list view will work as slide out items’ list, and framelayout will be kind of placeholder for your actual layout. Which eventually will be attached via fragments.
Below is the code to add them in the layout.
<FrameLayout
 android:id="@+id/content_frame"
 android:layout_width="match_parent"
 android:layout_height="match_parent" />
 <!-- The navigation drawer -->
<ListView
 android:id="@+id/left_drawer"
 android:layout_width="240dp"
 android:layout_height="match_parent"
 android:layout_gravity="start"
 android:background="#111"
 android:choiceMode="singleChoice"
 android:divider="@android:color/transparent"
 android:dividerHeight="0dp" />
4 . Thus your final layout will look something like this.
<android.support.v4.widget.DrawerLayout xmlns:android="http://schemas.android.com/apk/res/android"
 android:id="@+id/drawer_layout"
 android:layout_width="match_parent"
 android:layout_height="match_parent" >
<FrameLayout
 android:id="@+id/content_frame"
 android:layout_width="match_parent"
 android:layout_height="match_parent" />
 <!-- The navigation drawer -->
<ListView
 android:id="@+id/left_drawer"
 android:layout_width="240dp"
 android:layout_height="match_parent"
 android:layout_gravity="start"
 android:background="#111"
 android:choiceMode="singleChoice"
 android:divider="@android:color/transparent"
 android:dividerHeight="0dp" />
</android.support.v4.widget.DrawerLayout>
Here, we are prepared with layouts. Now it’s time to handle the layout and events in java class
Java
1. Define drawerlayout objects in onCreate method, it’s better to write a separate method for readability.
        drawer = (DrawerLayout) findViewById(R.id.drawer_layout);
        adapter = new DrawerAdapter(this, R.array.drawerArray);
        drawerList = (ListView) findViewById(R.id.left_drawer);
        actionBarDrawerToggle = new ActionBarDrawerToggle(this, drawer,R.drawable.ic_drawer, R.string.open_drawer,R.string.close_drawer) {
            @Override
            public void onDrawerOpened(View drawerView) {
                // TODO Auto-generated method stub
                super.onDrawerOpened(drawerView);
            }
        };
2. Note here: our drawer is actually a listview, that allows us to write custom or predefined adapters. That gives us more flexibility and creativity to define and layout our drawer. I have made a custom adapter out of BaseAdapter to draw custom list which defines different colors and adds tags to each list item.
drawerList.setAdapter(adapter);
3. To Listen to each item click, we usually setOnItemClick listener on list, that’s exactly we need to do here.
drawerList.setOnItemClickListener(this);
4. The below line is to listen to open and close events on drawer itself.
drawer.setDrawerListener(actionBarDrawerToggle);
5. At this stage we have defined the layout of drawer and populated it with desired data. Now we need to listen to each click of the drawer. And we have already implemented OnItemClickListener, which asks us to override onItemClick method. On this stage we need to define and handle transactions of fragments. If you are not familiar with fragments, it’s the right time to study fragments api. This is the place where our implementations are going to differ. Here is the placeholder example for it.
    @Override
    public void onItemClick(AdapterView parent, View view, int position, long id) {
        // TODO Auto-generated method stub
        openFragment(position);
    }

    private void openFragment(int position) {
        FragmentManager manager = getSupportFragmentManager();
        switch (position) {
        case 0:
            FragmentOne firstFragment = new FragmentOne();
            manager.beginTransaction()
                    .replace(R.id.content_frame, firstFragment).commit();
            break;
        case 1:
            FragmentTwo otherFragment = new FragmentTwo();
            manager.beginTransaction()
                    .replace(R.id.content_frame, otherFragment).commit();
            break;
        case 2:
            AppPrefsFragment prefsFragment = new AppPrefsFragment();
            manager.beginTransaction()
                    .replace(R.id.content_frame, prefsFragment).commit();
            break;

        default:
            break;
        }
        drawer.closeDrawer(drawerList);

    }
And viola!! We have our navigation drawer ready.
Notes
1. Works really well with actionbar sherlock. Infact the java part of the code above is the same code which works with actionbarsherlock. Except one thing. With ABS we can not set drawer open or close on icon click
2. As per android guidelines actionbar will always be present whether drawer is opened or not. So we have to be careful while putting action items while drawer opened or closed
3. This works well with single activity, many fragments approach. However we are free to open activities, but to provide consistency either we have to stick with fragments, or provide drawerlayout everywhere.
4. The layout elements from xml files seems to be compulsory for me (Any corrections are welcome)
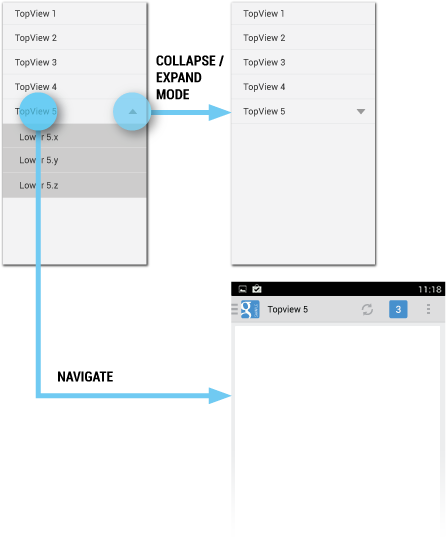
5. Again, as the drawer is a list, we can do anything with that, As shown in screenshot multilayered draweritems can be possible. Adapter is our magic hat here.
Related articles
- Design Docs Update: The Navigation Drawer Is Now Officially A Standard (androidpolice.com) [They were first to predict this feature will come in google I/O.

Hi, could you help me on how to implement the multilayered draweritems you talked about in note 5. I have tried ExpandableListView but dont seem to get it right. Any help will be appreciated. Thankyou
Hi Maxwell.
If you are familiar about ExpandableListView there are Many good examples of how to set up an ExpandableListView Properly. To set up the expandable list view refer following blogs/samples.
http://androidtrainningcenter.blogspot.in/2012/07/android-expandable-listview-simple.html
Based on above I have created a sample app how to use expandable list view.
Note: This sample works only on api 11+. It has made on the fly just to show the use of expandable list view.So right now no ABS is implemented it.
The sample app can be found at
https://github.com/PrashamTrivedi/DrawerLayoutTest
Thank you Trivedi,
I had managed to get to that point with a lot of ease. What I could not implement was an ExpandableListView with headers as shown in their documentation. I have been trying to look for one all over but have not found any yet.
Google made a good move by putting a list view as actual drawer control. Thus giving us more power and control based on how well we right our adapters.
How is it structured so it reveals itself underneath the Fragment (like in LinkedIn, Evernote and Spotify)? Also when opening drawer the right hand side Fragment (?) also scrolls to the right. Both drawer and right hand pane scrolls at different speeds.
I came across this after getting ActionBarSherlock to work with the example NavigationDrawer project, but the icon won’t open the drawer. I noticed you’ve found the same thing. Any idea of the issue with that and if it might be ActionBarSherlock that needs to update something on their side for this to work? Thanks!
There are couple of workarounds, I found in some Google plus posts. I am working on it, and as soon as I evaluate all the options I will post about it.
As the explanation of the issue : ABS uses SherlockMenuItem in onOptionItemSelected whenever we use sherlock activities or fragments. And on the other hand, NavigationDrawer needs android.view.MenuItem. And they are not compatible with each other.
So as possible workarounds
1. Either write a compatible class for ActionBarDrawerToggle for abs. (There are some online libraries I am evaluating)
Or
2. Write a conversion logic from SherlockMenuItem to android.View.MenuItem.
FYI : From Jake Wharton(Author of ABS), I think there is nothing updated about this issue.
I am evaluating both the options and will post as soon as I find something.
Ah, good deal. I look forward to finding a solution to this as well, thanks for the info!
I was finally able to get tapping the icon to open and close the drawer in both 2.x and 4.x by using a different form of the onOptionsItemSelected() method found on another site.
Here’s the method I swapped out:
@Override
public boolean onOptionsItemSelected(MenuItem item) {
if (item.getItemId() == android.R.id.home) {
if (mDrawerLayout.isDrawerOpen(mDrawerList)) {
mDrawerLayout.closeDrawer(mDrawerList);
} else {
mDrawerLayout.openDrawer(mDrawerList);
}
}
return super.onOptionsItemSelected(item);
}
found on this site:
http://www.androidbegin.com/tutorial/implementing-actionbarsherlock-side-menu-navigation-drawer-in-android/
Hope this is helpful for your tests as well. Thanks!
Ofcourse you can make it so when u click on the icon it opens and closes.
https://www.youtube.com/watch?v=z3QE74xRxp8 there you can see a nice tutorial and the code used.
Hi,
I tried to build the above code, but I get an error with getSupportFragmentManager()
My class extends Activity and it asks me to use getFragmentManager() instead. How did you manage to build using getSupportFragmentManager()???
getSupportFragmentManager() comes from Support Library. To use this check following.
1. Check if you have libs folder and android-support-v4.jar is there in project or not. (If not add this)
2. Go to project settings (in eclipse) and check whether android private libray option is checked. (If not check it, and if you fumble somewhere check stackoverflows)
3. You are ready to use support library, If you want to use getSupportFragmentManager() extend your activity with FragmentActivity. Else use activity and just use getFragmentManager().
Essentially both are same, support library is too good for some tasks, but in this case only useful when you target OS 2.x and 3.x. If your target is not below 4.0 don’t use support library elements here…
Hi All, i implemented this successfully, but in Gingerbread It display “up navigation icon” instead of DrawerToggle animation. (ICS version works fine 🙂 ) Can give me a help to fix this issue?
Hi,
As far as I Know ABS has updated to handle navigation drawer. So it should work, frankly I never got that time to try myself though.
However there is a workaround to show that icon to indicate there is a menu drawer, but being on 2.2 or 2.3 there is no guarantee that it will animate like it’s done in ICS.
To implement the workaround, follow these steps.
1. in your Styles.xml create a style whose parent is parent=”@style/Theme.Sherlock.Light.DarkActionBar” // use whatever actionbar you are using for your app.
2. Create this style as a child of step 1. @drawable/ic_drawer
here ic_drawer is the drawable you want to replace with that arrow.
Hi Prasham, It wasnt make a successful outcome for me.